How To Protect Your DSLR Gear In A Backpack
Imagine you’re halfway up a scenic trail, your camera ready for that golden-hour shot, when you feel a jolt as your gear shifts inside your bag. Not exactly the confidence boost you hoped for. If you’re wondering how to protect your DSLR gear in a backpack, you’re in the right place.
In this guide, you’ll learn simple steps to keep your camera body, lenses, and accessories safe—whether you’re hiking, flying, or commuting. You’ll see how to pick the best backpack, add extra padding, manage moisture, secure zippers, balance weight, and maintain your setup. Let’s dive in.
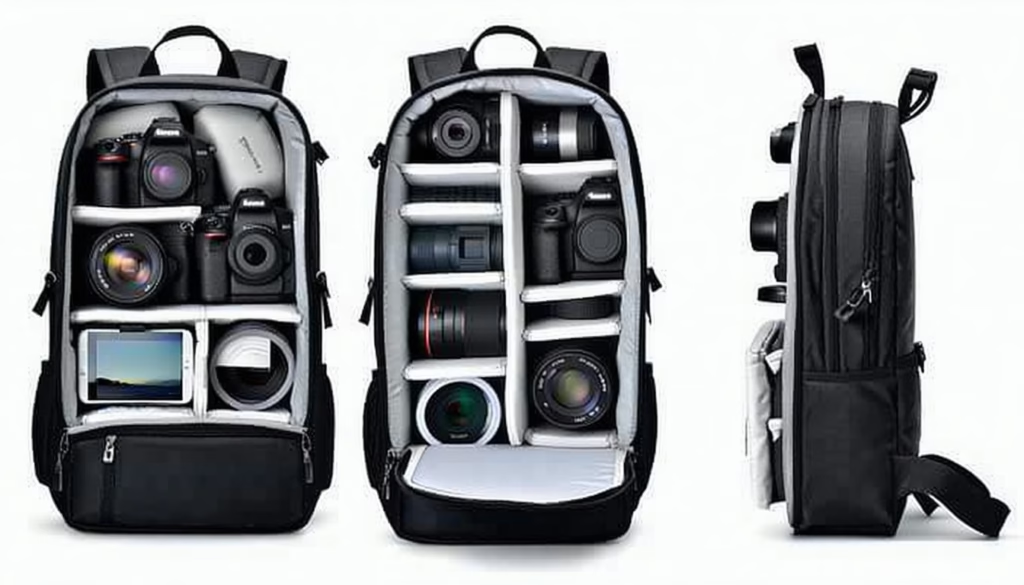
Choose a Protective Backpack
Picking the right pack is step one in safeguarding your DSLR gear. Look for these key features before you click “buy.”
| Feature | Why It Matters | Look For |
|---|---|---|
| Padded Dividers | Cushions lenses, and bodies | Thick, adjustable foam inserts |
| Weatherproof Material | Keeps moisture out | Rain-resistant nylon, sealed seams |
| Lockable Zippers | Prevents sneaky snatch-and-grabs | Metal teeth, padlock loops |
| Tripod Straps | Let’s you carry a tripod hands-free | Quick-release, padded straps |
| Memory Card Pockets | Organizes cards and keeps them dry | Zippered or magnetized compartments |
Here’s the thing: a backpack built for cameras can be a game-changer. For a deeper dive into shell materials and seam sealing, check out what to look for in a waterproof camera backpack. And if you’re still browsing models, this list of essential features every photographer should want in a backpack can help you compare options.
Use Proper Padding
Even the best bag can’t protect unpadded gear. Let’s make sure every piece has its cushy fortress.
Adjust Foam Dividers
- Customize the layout around your camera body and lenses
- Keep bulky items snug against the pack walls
- Avoid empty gaps where the gear can shift
Add Extra Inserts
- Slip in neoprene lens pouches for fragile glass
- Use padded wraps around irregular items (flash units, battery grips)
- Stack thin foam sheets between lens barrels
Line with Lens Cloths
- Tuck microfiber cloths under delicate elements
- Double as quick-clean wipes when you shoot
- Change cloths out after dusty adventures
By layering protection—dividers, pouches, and soft cloth—you create multiple barriers against bumps and scratches.
Organize Gear Smartly
A tidy pack is a secure pack. Here’s how to arrange your kit for maximum safety and speed.
Pack Heavy Items Low
Bolts of gravity work against you if heavy pieces sit at the top. Place your camera body and big lenses close to your lower back to improve balance and reduce swinging.
Separate Lenses and Body
Stacking glass on glass invites disaster. Allocate each lens its own compartment, or keep bodies and glass apart with a thin partition. For more on ingenious layouts, visit the best camera backpack layouts for fast access.
Protect Memory Cards
Loose cards can vanish or warp. Store them in a dedicated case, then slip that into a zipped pocket. If you need tips on card safety, see the safest way to store memory cards in a backpack.
Stash Small Accessories
Batteries, filters, cables—these extras need their own home. Use small zip pouches or mesh pockets to stop them from rolling around or scratching your gear.
Keep Moisture at Bay
Water and electronics don’t mix. Here’s how to stay dry when the skies open up.
Use a Rain Cover
A built-in rain fly or detachable cover shields your pack in sudden downpours. Many models include one, but aftermarket covers work, too. For top picks, check out camera backpacks with built-in rain covers.
Pack Silica Gel
Slip a few silica gel packets into your compartments. They’ll absorb stray moisture and help prevent mold on leather straps or rental gear.
Store in Waterproof Bags
For extra peace of mind, stash vulnerable items (flash units, memory cards) in small ziplock or dry bags. This double protection can be a lifesaver on misty hikes or kayak shoots.
Wipe Dry Immediately
After a soggy shoot, remove gear and hang your backpack upside down to air out. Letting moisture linger risks fabric breakdown and mildew.
Secure Zippers and Locks
Open zippers and wandering straps can cost you more than time. Lock everything down.
Lockable Zippers
Choose packs with loops on the zipper pulls. A compact padlock or cable lock can deter casual thieves.
Zip Up Tight
Always fully close each compartment before you move. Half-zipped pockets let gear slip out or catch on tree branches.
Use Cable Ties or Clips
For a quick hack, twist cable ties through zipper pulls or use small carabiners. They won’t stop a determined thief, but they keep zippers from popping open as you hike.
Stash Valuables Closest
Keep phones, wallets, and passports in hidden pockets. Many camera backpacks feature anti-theft compartments along the back panel.
Balance Weight Evenly
An unbalanced pack can strain your back and jostle your gear. Spread the load wisely.
Distribute Side to Side
Arrange lenses and bodies so neither shoulder bears more weight. Swap items left to right until you feel even.
Use Hip Belt and Sternum Strap
A snug hip belt shifts most weight off your shoulders. Clip the sternum strap to prevent shoulder straps from sliding outward.
Avoid Overpacking
More gear means more movement. Prioritize essentials—if you’re not using it, leave it behind. For ideas on trimming down, read how to avoid overpacking a camera backpack.
Shift Gear on the Go
Mid-day shoots might mean switching lenses. Rebalance afterward to keep comfort high and gear stable.
Handle Backpack Carefully
Your hands matter as much as your pack. Treat it with the care you’d show your camera.
Lift with Your Legs
Squat, grab the hip belt, then stand. This technique protects your back and prevents sudden jerks.
Avoid Dropping
Set the pack down gently, especially on hard surfaces. A careless thump can jar delicate electronics.
Check Shoulder Straps
Inspect straps for frays or loose stitching. For tips on preventing back pain when carrying camera gear, see how to prevent back pain when carrying camera gear.
Use a Top Handle
If you need to stash your backpack in a car or overhead bin, grab by the reinforced top handle—not the straps or dividers.
Maintain Your Backpack
A little upkeep goes a long way in protecting your gear.
Clean Regularly
Shake out crumbs, dust, and grit after each trip. Spot-clean scuffs with mild soap and water. You can learn step-by-step cleaning at how to clean and maintain a camera backpack.
Inspect Zippers and Seams
Run zippers back and forth to clear debris. Trim stray threads and apply zipper lubricant to keep pulls smooth.
Replace Worn Inserts
Foam chunks compress over time. Swap out old dividers or add fresh padding when you notice extra wiggle room.
Store Empty and Open
When you’re not shooting, leave your backpack unzipped in a dry, ventilated space. This helps fabric recover and prevents odors.
Frequently Asked Questions
How do I cushion my DSLR lenses inside a backpack?
Use adjustable foam dividers for each lens, then wrap them in neoprene pouches or microfiber cloths. This double layer stops lens elements from banging together.
Can I leave my DSLR gear in a car overnight?
It’s best to avoid it. Temperature swings and humidity can harm electronics and glass. If you must, stash gear in a locked trunk with silica gel packs.
Is silica gel safe around cameras?
Yes, silica gel is non-toxic and won’t damage your gear. Just swap packets every few months so they stay effective.
How often should I clean my camera backpack?
Give it a quick shake-out after every shoot. Do a deeper clean—wiping panels, laundering covers—every 3 to 6 months, depending on use.
What’s the best way to carry a tripod?
Use integrated tripod straps or side loops. For more methods, see how to carry a tripod using a camera backpack.
Do I need a hard case if I use a backpack?
A backpack protects against daily bumps, but a hard case offers superior crush resistance. Compare both in camera backpack vs. hard case: which is better.
DSLR Gear Protection Summary
Protecting your DSLR in a backpack comes down to picking the right pack, layering padding, staying organized, and guarding against moisture. Secure zippers, balance weight, handle your bag with care, and keep up regular maintenance. With these steps, you’ll carry your gear confidently—ready for every shot without worrying about bumps or spills.
Now it’s your turn. Pack up wisely, head out, and let nothing stand between you and that perfect frame.

How To Use Packing Cubes For Ultimate Luggage Organization

How To Add Extra Pockets For Tools On The Backpack
