How To Avoid Overpacking A Camera Backpack
When you’re heading out for a shoot, stuffing your camera pack full of every gadget seems tempting. But you’ll feel the extra weight the moment you hit the trail. In this guide, we’ll walk through how to avoid overpacking a camera backpack, so you carry only what you need and move freely.
Ever feel your shoulders ache before you’ve even snapped your first frame? By streamlining your kit with a few simple steps, you’ll drop pounds off your load without missing a shot.
Plan Your Gear
First, figure out what you really plan to shoot. Are you chasing landscapes, portraits, or action on the move? Pinning down your subject matter helps you trim off gear that won’t earn its place.
Assess Your Shooting Needs
Think about your location, lighting, and style.
- Landscape outings usually call for a wide-angle lens, tripod, and extra filters
- Portrait sessions often need a midrange prime, reflector, and spare batteries
- Fast-paced events might demand a telephoto zoom, backup body, and high-speed cards
By focusing on your shoot’s demands, you’ll skip gear that just adds weight.
Build a Custom Checklist
Write a tailored gear list before every trip.
- Note core items first: camera body, go-to lens, memory cards
- Add only a couple of swap-out lenses or accessories if truly needed
- Check off each item the night before you pack
A concise checklist stops you from tossing in “just-in-case” extras that slow you down. For more on essential features, see essential features every photographer should want in a backpack.
Choose Versatile Equipment
You don’t need every lens in your collection. Pick gear that can multitask so you avoid lugging backups you’ll never use.
Pick Multi-Use Lenses
A zoom lens with a 24–70mm range can handle landscapes, portraits, and street scenes. Asking yourself “Do I really need that 135mm prime?” helps you resist adding extra glass. One quality zoom often beats two primes in weight savings.
Limit Extra Bodies
Carrying two camera bodies feels safe, but it doubles bulk. If you do pack a backup, go with your lightest second body. That way you still have redundancy without a backpack that feels like a rock on your back.
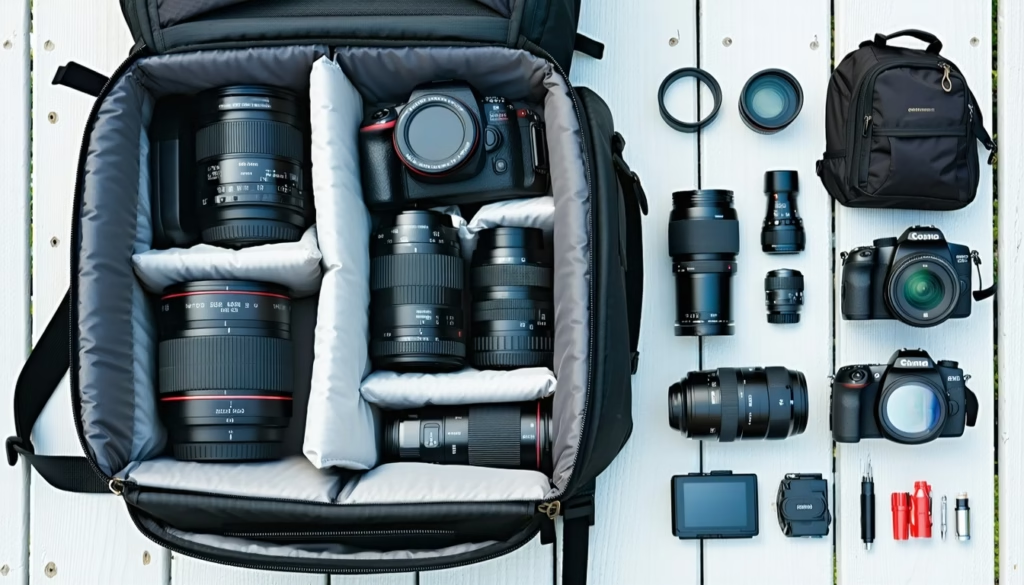
Organize With Dividers
Good organization keeps small items from multiplying chaos. A neat layout also stops you from packing “just one more thing.”
Customize With Inserts
Modular dividers let you carve out snug spots for each lens and body.
- Use how to customize a camera backpack with inserts to learn fitting tips
- Carve larger compartments for cameras, and slim slots for filters or batteries
When each item has its home, you won’t overstuff pockets or lose track of gear.
Group Accessories
Bundle similar accessories in pouches or small cases.
- Store memory cards in a labeled wallet for quick swaps
- Clip spare cables and lens cloths inside a zippered pocket
Grouping stops loose items from creeping into every nook and adding needless bulk.
Pack Only Essentials
Once you’ve planned and organized, it’s time to purge. Be honest about what you’ll actually use.
Prioritize Core Gear
Your camera, main lens, and power sources earn the top spots in your pack. Ask yourself: will that extra flash or specialty filter get real play time? If the answer’s no, leave it behind.
Skip Nonessential Items
Here’s the thing, a small cleaning kit, a mini tripod head, or an extra strap might seem harmless. But these extras add up fast. Limit yourself to one cleaning tool, one strap, and only the filters you’re sure to need. If you’re packing a drone alongside cameras, check out our tips for packing a drone and camera together safely so you don’t overload.
Balance Your Load
A balanced backpack feels lighter. It also protects your back and lets you move without stumbling.
Position Heaviest Pieces
Place your camera bodies and heavy lenses closest to your spine. That way your core supports most of the weight. Ever lean forward just to keep your pack from pulling you back? Proper placement fixes that.
Even Out Weight
Distribute medium-weight items—like battery packs and small accessories—on either side of your spine. Use how to balance weight in a camera backpack for a deeper dive. Balanced loads keep you stable, whether you’re hiking rocky trails or weaving through crowds.
Protect Your Kit
Avoid overpacking by choosing protective solutions that do double duty—padding and water resistance help you carry less external cladding.
Secure Fragile Gear
Padded removable cubes or camera cubes cradle your bodies and lenses.
- Look into how to secure expensive gear inside a camera backpack
- Use quick‐release straps or clip-in systems to lock bodies in place
When gear feels snug, you won’t need extra covers or bulky cases.
Weatherproof Your Pack
A built-in rain cover beats fitting waterproof cases for each item.
- Check weatherproofing tips for your camera backpack to keep moisture out
- Look into what to look for in a waterproof camera backpack before you buy
One integrated cover outweighs carrying individual dry bags. Plus, it zips away when skies clear.
Travel Smart
Even the best-packed bag can feel heavy once you unpack it at your destination. Let’s talk about clever carry methods and layouts.
Use Carry-On Strategies
If you’re flying, your backpack often lives under the seat or overhead bin.
- Follow how to travel with a camera backpack on a plane for TSA-friendly tips
- Weigh the pros and cons in our camera backpack vs hard case: which is better comparison
Keeping your kit on board stops you from packing extra protective sleeves or duplicate gear.
Plan Quick Access
Arrange your most-used gear near side or top doors.
- Try layouts from the best camera backpack layouts for fast access
- Secure a tripod externally with easy-release straps
Quick access means you won’t unzip every compartment to fish out one lens. That saves time and prevents you from dumping in backups just to feel safe.
Frequently Asked Questions:
How many lenses should I really pack?
Aim for two to three lenses that cover your shoot’s focal ranges. You’ll save weight and still stay flexible.
What’s the best way to store memory cards?
Use a labeled card wallet that fits in an internal pocket. That way you avoid loose cards rattling around.
Can I bring a small tripod in my pack?
Yes, consider a compact model or use external straps. For more, see how to carry a tripod using a camera backpack.
How do I protect gear in rainy conditions?
Rely on an integrated rain cover and waterproof zippers. Read weatherproofing tips for your camera backpack for full guidance.
Should I carry extra batteries or memory cards?
Always pack one extra battery and a couple of cards. Anything beyond that usually just adds weight.
How can I test my packing setup before a trip?
Do a trial run at home. Wear your loaded pack for 15 minutes, adjust as needed, and remove anything that feels unnecessary.
Conclusion
Overpacking a camera backpack sneaks up on every photographer. By planning shoots, choosing versatile gear, and organizing smartly, you’ll slim down your load without missing any shots.
Give these tips a try on your next outing. You’ll notice less strain and gain more freedom to focus on capturing your best images.

How to Clean and Maintain a Pet Carrier Backpack Without Stress

How To Add Extra Pockets For Tools On The Backpack