The Best Packing Order For Cameras And Accessories
If you’re wondering the best packing order for cameras and accessories, you’re in the right spot. Traveling with delicate gear can feel like juggling eggs—one wrong move and you end up with a cracked lens or scratched body. Let’s be honest, none of us have time to babysit our gear at every airport checkpoint or trailhead.
In this guide, you’ll learn a step-by-step system to lay out, pack, and secure your camera bodies, lenses, and all those little extras so they’re safe, balanced, and ready whenever inspiration strikes. You’ll discover how to optimize compartments, prevent condensation, and even stash snacks without damaging your kit. By the end, you’ll have a foolproof routine that leaves you feeling confident—and maybe a little smug—every time you zip up your backpack.
Prepare your layout plan
Before you toss anything into pockets, clear a large surface—your desk, bed, or kitchen table works fine. Seeing everything at once helps you plan the order and spot anything missing.
Empty and categorize gear
- Take out all camera bodies, lenses, filters, chargers, cables, tripods, and personal items
- Group similar items together: bodies in one pile, lenses in another, small accessories in a third
- Inspect each piece for dirt or moisture before packing
Adjust compartment sizes
- Reconfigure your insert dividers to match the bulk of your bodies and lenses
- Save a section for bulky items like gimbals or flash units
- If you’re not sure which backpack meets airline rules, check our guide on how to choose a camera backpack for air travel rules
Secure straps for comfort
- Loosen straps fully so dividers slide easily
- After packing you’ll tighten everything for balance
- Learn how to keep straps from slipping in our strap-slip guide
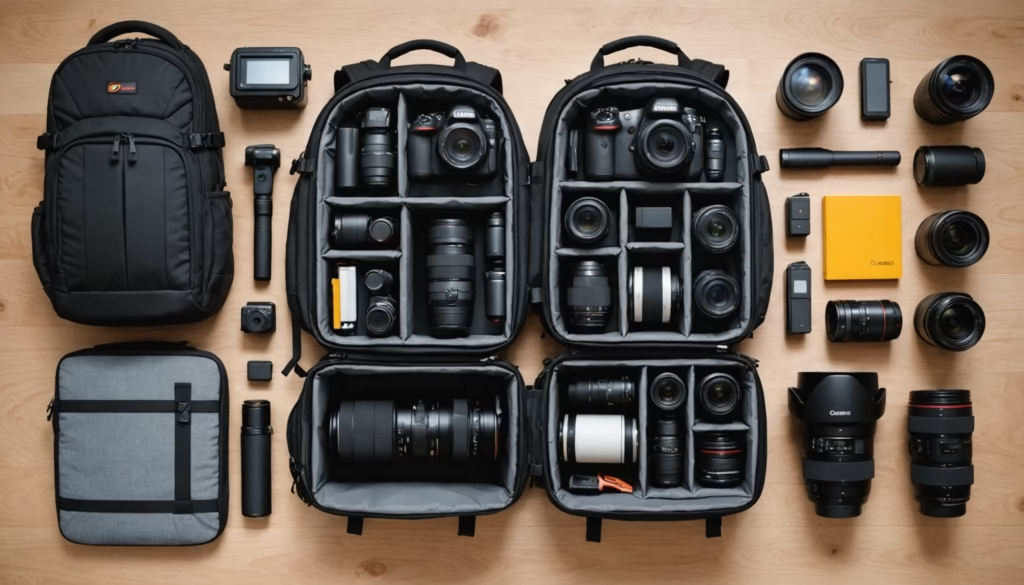
Pack camera bodies
Your camera bodies are the heart of your kit, so they go in first—closest to your back for protection and balance.
- Place bodies in padded sections in an upright position
- If you have mirrorless and DSLR combos, put the heavier body closest to your spine
- Cover each body with a lens cap or wrap for dust protection
That way, if you need to pull out your backup body fast, it’s right at your fingertips without digging through every pocket.
Store lenses safely
Lenses are fragile and often your priciest assets. Let’s make sure they travel in style.
Position lenses upright or flat
- Put wide-angle and prime lenses upright to keep weight centered
- Stack smaller primes flat on top of larger zooms if your dividers allow
- For more tips on lens placement, check best practices for storing lenses upright or flat
Cushion with padding
- Slip lenses into neoprene pouches or wrap them in microfiber cloths
- Fill any gaps with soft accessories—gloves or microfiber towels work
- Avoid just tossing lenses between bodies, you risk scratches on glass or mounts
Secure fragile accessories
Your flash units, triggers, and gimbals deserve a safe spot, too. Here’s how to prevent damage and moisture issues.
Use protective pouches
- Invest in padded pouches for triggers, flashes, and gimbals
- Keep each accessory in its own bag to prevent rubbing
- If your unit has a detachable head, pack it separately for better fit
Prevent condensation buildup
- Slip in silica gel packs to absorb moisture
- Never seal damp items—let them air dry before you pack
- Learn more tricks in our post on how to prevent condensation inside camera backpacks
Organize small gear
Filters, memory cards, batteries, cables—they may be small, but they’re mission-critical. Here’s how to keep them sorted.
Tidy cables and chargers
- Coil cables neatly and secure with Velcro ties
- Store chargers in a waterproof pouch or ziplock bag
- For advanced cable hacks, see organizing cables and chargers in a camera backpack
Stash filters and memory cards
- Use a dedicated filter case to prevent scratches
- Label each slot clearly—no more fishing for the right ND filter
- Drop memory cards into a waterproof, shockproof case
Optimize compartment usage
Smart packing isn’t just about safety, it’s about speed. You want your most-used gear within easy reach.
Plan for fast access
- Reserve a side or top pocket for your go-to lens or mirrorless body
- Place spare batteries and a lens cloth in an outer zip for quick swaps
- Get more ideas in our guide on how to organize a camera backpack for fast access shooting
Label your pockets
- Use colored tags or small sticky notes inside each pocket
- That way, “pocket yellow” means filters, “pocket blue” means cables
- It might feel over the top, but it beats searching in low light
Balance the weight load
If your pack feels lopsided, you’ll notice it on long hikes or airport runs. Here’s how to keep things centered.
Distribute gear evenly
- Mirror the layout on left and right sides: if a heavy lens is on one side, put a body on the other
- Keep about 60 percent of weight close to your back and 40 percent toward the center
Adjust straps daily
- After packing, tighten the hip belt and shoulder straps for a snug fit
- Loosen everything before unpacking to slide dividers easily
- Avoid sore shoulders by checking the strap position in our strap-slip guide
Add personal items
Once your gear is secure, it’s time for snacks, spare clothes, and that travel wallet.
- Pack lighter items like a water bottle or snack bar in side or front pockets
- Keep important documents or cash in an inside zippered pouch
- For tips on carrying food safely, see how to pack snacks and water in a camera backpack safely
Perform final checks
Almost there—just a few more quick steps before you zip up and head out.
- Give your pack a gentle shake to hear any rattles
- Check that all zippers are closed and locked (if you use locks)
- Consider anti-theft strategies in how to protect camera gear from theft while traveling
- Review the most common mistakes when packing camera gear to avoid surprises
Frequently asked questions
How do I choose the right divider configuration?
Start by placing your largest lens in the bottom center, then build dividers around it. Adjust as you add bodies and smaller lenses so nothing shifts.
Should I pack my flash and trigger together?
No, keep them in separate padded pouches. That prevents the hot shoe contacts from rubbing and reduces the risk of a trigger misfire.
Where’s the best spot for my drone?
If your backpack has a flat, padded front panel, that’s ideal. Otherwise, store it in the bottom section with extra padding and silica packs.
Can I pack camera batteries loose?
Avoid that—loose batteries can short out. Use a dedicated battery case or insulated pouch to keep terminals apart and moisture out.
What’s the trick for tripod storage?
Collapse your tripod fully, secure the legs with Velcro, and slide it into side straps or a dedicated sling. Check tips for carrying multiple tripods with a backpack if you travel with two.
How do I prevent lens fogging in cold weather?
Keep silica gel packs in each compartment and let gear acclimate slowly to temperature changes. For more on moisture control, see how to prevent condensation inside camera backpacks.
Is it okay to carry personal electronics with my camera gear?
Yes, but use separate padded sleeves for laptops or tablets. Keep them in designated pockets away from heavy lenses to prevent pressure points.
Conclusion
Packing your camera gear in the right order saves time, reduces stress, and protects your investment. By following this routine—laying everything out, securing bodies and lenses first, organizing small bits, and balancing weight—you’ll breeze through checkpoints and trailheads alike. Give it a try on your next trip, and let us know which tip made your life easier in the comments below!