How To Secure Expensive Gear Inside A Camera Backpack
Figuring out how to secure expensive gear inside a camera backpack might feel like a puzzle. Your pricey camera bodies, lenses, and accessories need the right setup to stay safe from bumps, drops, and curious hands. With a few simple tweaks, you can turn your pack into a fortress for your kit.
In this guide, you’ll learn how to pad, organize, and lock your camera backpack, so your gear stays protected whether you’re hiking, shooting events, or traveling abroad.
Know Your Backpack
Before you stash equipment, spend time exploring what your pack can handle. Not all camera backpacks deliver the same protection or layout. Let’s walk through the key features you should inspect.
Check Material and Build
- Choose tough fabrics such as ripstop nylon or polyester.
- Reinforced stitching at stress points reduces tear risk.
- A padded back panel and shoulder straps boost comfort on long hauls.
Evaluate Compartments
- Count removable dividers and padded pockets.
- Note which slots adjust to fit lenses, bodies, or drones.
- Hidden zippered pockets are perfect for memory cards or cash.
Assess Security Features
- Anti-theft zippers let you lock pulls together.
- RFID lining blocks wireless scanning of tags or cards.
- Lockable pulls can work with mini padlocks for extra peace of mind.
Don’t overlook essential features every photographer should want in a backpack.
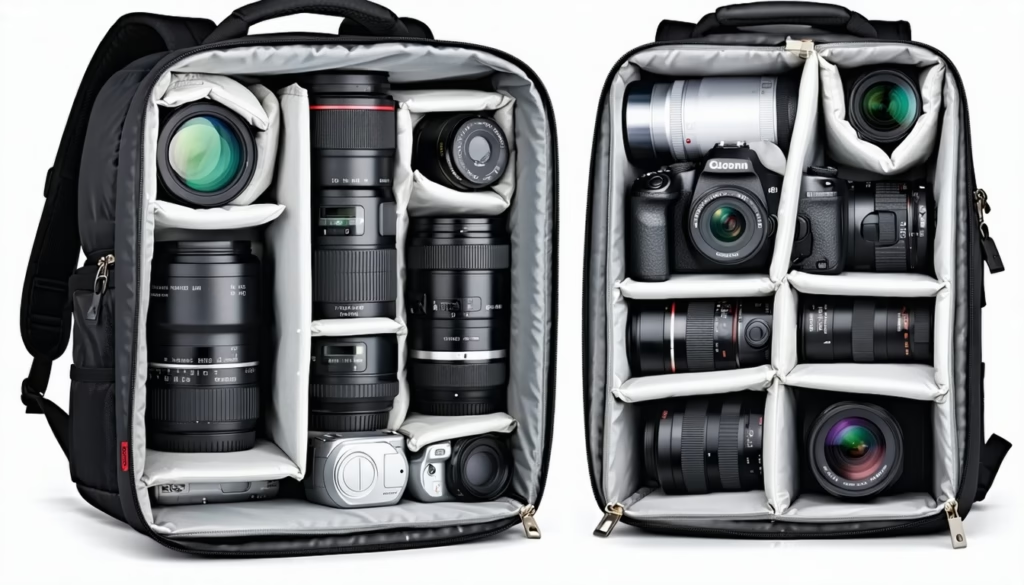
Customize Interior Layout
When your pack’s internal layout matches your shooting style, gear stays put. A clean setup helps you find items quickly and keeps equipment snug.
Use Modular Dividers
- Start with full dividers in a box shape around each item.
- Remove or reposition dividers to eliminate excess space.
- Swap in smaller panels for lenses, bigger ones for bodies.
Organize by Priority
- Place your most-used body or lens near the top.
- Store backup gear deeper to avoid accidental knocks.
- Keep fragile accessories in the center, away from walls.
Consider Quick-Access Layouts
- Assign a side pocket for your go-to lens or camera.
- Test both left and right zipper paths to find your fastest route.
- Link to the best camera backpack layouts for fast access.
Pad Fragile Items
Proper padding is your first line of defense against shock. Even a short drop can damage delicate glass or electronics.
Layer with Foam Inserts
- Add a 1/2 inch foam sheet between bodies.
- Insert extra foam blocks beneath lenses.
- Use pre-cut foam or trim high-density sheets to shape.
Wrap in Protective Cloth
- Slide lenses into microfiber pouches before tucking into slots.
- Wrap flashes or triggers in lens tissue or bubble wrap.
- Secure cloth wraps with elastic bands to prevent slipping.
Group Similar Items
- Keep lenses of similar length together to save space.
- Store memory cards in a rigid case in a side pocket.
- See best ways to organize lenses inside a camera backpack.
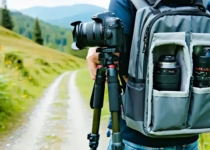
Fasten Straps and Clips
Straps and clips stop gear from shifting inside or outside your backpack. Loose bits can scratch, dent, or unbalance your load.
Secure Tripods and Monopods
- Use built-in tripod straps or dedicated loops.
- Clip legs to external hooks or daisy chains.
- Try how to carry a tripod using a camera backpack.
Tuck Loose Ends
- Bundle excess strap length to avoid snags.
- Clip loose buckles inside the pack or under flaps.
- Keep all closures tight to eliminate movement.
Use Velcro and Elastic Bands
- Fasten small items like lens caps with wrap-around Velcro.
- Wrap cables and remotes in elastic bands to keep them compact.
- Label bands by function to grab what you need fast.
Lock Your Zippers
Locking zippers is a visible deterrent and a practical block against thieves. A small lock can buy you time if your pack is left unattended.
Choose TSA-Friendly Locks
- Look for locks marked “TSA approved.”
- Set a code you’ll remember to avoid lockouts.
- TSA can open the lock without damage during inspections.
Use Cable Locks for Extra Security
- Thread a thin steel cable through dual zipper pulls.
- Secure the cable back to the lock or a frame point.
- Cables adapt to irregular shapes, great for odd zipper paths.
Compare Lock Options
| Lock Type | Pros | Cons | Best Use |
|---|---|---|---|
| Combination Padlock | No key, TSA-friendly | Code can reset by slip | Long trips, airport security |
| Cable Lock | Flexible, secures multiple | Can be cut with tools | Outdoor shoots or busy areas |
| Integrated Anti-Theft | Built-in, cut-resistant | Higher cost | Daily commute or urban travel |
| Keyed Mini Lock | Small and sturdy | Risk of lost key | Studio or car park storage |
Check out camera backpacks with an anti-theft design to buy now.
Protect from Weather
Rain or dust can ruin electronics on contact. You need a plan to repel moisture and grit so your kit stays dry no matter what.
Waterproof Cover
- Carry a rain cover tucked in a bottom pocket.
- Quickly drape it over the bag when clouds roll in.
- Choose a cover that cinches tight around the base and straps.
Water-Resistant Compartments
- Store electronics in internal pockets lined with water-repellent fabric.
- Zip closed all flaps before you hit wet terrain.
- Ensure seams are taped or sealed to block leaks.
Dry Bags for Electronics
- Slip memory cards and batteries into small dry bags.
- Place cameras or drones in larger waterproof sacks.
- See weatherproofing tips for your camera backpack.
Balance Weight Strategically
An unbalanced pack can strain your back and shift unexpectedly. Distribute gear so your center of gravity stays close to your body.
Distribute Heavier Items Low
- Keep camera bodies and battery packs at the bottom.
- Place lenses mid-bag and lighter accessories near the top.
- This setup reduces sway as you walk or hike.
Keep Center of Gravity Close
- Position bulk toward your upper back, not your shoulders.
- Slide the bag up to your shoulder blades for a solid feel.
- Use chest or sternum straps to keep the bag snug.
Use Waist and Chest Straps
- Buckle the waist belt over your hips to share weight.
- Tighten shoulder straps so the bag sits close to your torso.
- Read more on how to prevent back pain when carrying camera gear.
Check and Maintain
Regular care keeps your backpack in top condition and your gear secure. A quick inspection before each trip pays off in protection.
Inspect Padding and Seams
- Look for tears in dividers and foam inserts.
- Check seam lines for loose threads or holes.
- Repair small rips with sewing kits or fabric tape.
Clean and Dry Regularly
- Wipe the exterior with a damp cloth to remove dirt.
- Air-dry the inside after wet shoots before storing.
- Read how to clean and maintain a camera backpack.
Replace Worn Parts
- Swap out battered dividers or foam blocks as needed.
- Replace zippers or buckles that stick or break.
- Keep spare straps and clips handy for field repairs.
FAQs
How do I lock my camera backpack?
Use a small padlock on dual zipper pulls or a cable lock through the loops. TSA-approved combination locks work if you’re flying, and keyed mini locks are great for local storage.
What’s the best way to protect my DSLR bodies inside the bag?
Wrap bodies in padded camera cubes or foam-lined dividers. Store them lens-down to cushion the mount and add a lens cap on each side for extra buffer.
Can I secure a tripod without extra straps?
Yes, many packs have built-in tripod loops. If yours doesn’t, slip the legs through a daisy chain or lash them to external compression straps to hold them tight.
How often should I inspect my backpack’s padding?
Give your pack a quick once-over before every shoot. Check for soft spots or compressed foam—you may need to replace inserts every few months depending on use.
Are waterproof covers enough in heavy rain?
Rain covers help, but adding dry bags for high-value electronics gives extra safety. Make sure zippers are fully sealed and seams taped to block any moisture.
What size lock should I buy for my bag?
Choose a lock that fits over your zipper pulls without forcing the closure. Mini TSA combination locks work on most standard camera backpack zippers.
Conclusion
Securing your expensive gear inside a camera backpack comes down to knowing your bag, customizing its layout, and adding layers of protection. By padding fragile items, fastening straps, locking zippers, and weatherproofing, you’ll keep your kit safe no matter where your shoots take you.
Give these tips a try on your next outing. Pack with confidence, and share your favorite security hack in the comments below so fellow photographers can benefit too.
How To Carry A Tripod Using A Camera Backpack
How to Carry Diaper Backpack Alongside Other Gear Easily
