Layering In-Pack Insulation For Hot Lunch in School Backpacks

Layering in-Pack Insulation for Hot Lunch in School Backpacks
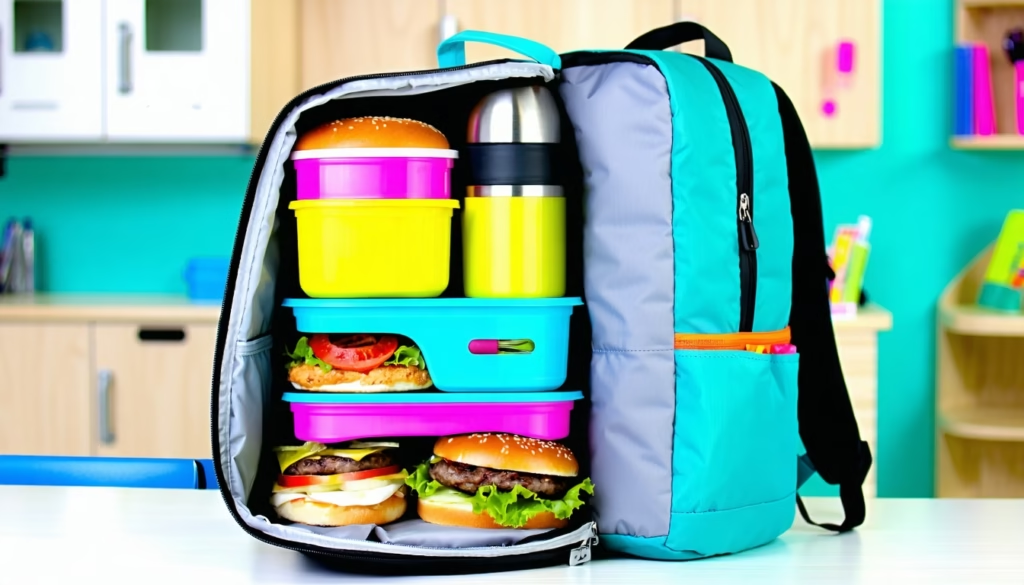
Packing a warm lunch that still feels steamy when you’re ready to eat takes more than just tucking in a thermos. By using layering in-pack insulation for hot lunch in school backpacks, you can keep soups, casseroles, and mac and cheese perfectly cozy until the bell rings. In this guide, you’ll discover how to choose the right materials, build a multi-layer barrier against heat loss, and organize your pack for maximum warmth. Let’s dive in so your lunch always tastes fresh and comforting.
You’ll learn:
- Which insulation options work best
- How to layer materials for top performance
- Smart packing and maintenance tips
Understanding Lunch Insulation
Insulation traps heat so your meal stays warm. When you use in-pack thermal barriers, you slow down heat escaping into the cooler backpack environment. That means your pasta bake or chili won’t turn into a lukewarm disappointment by midday.
Why Does Warm Lunch Matter?
You’re more likely to finish a satisfying meal when it’s hot. Cold leftovers often end up in the trash, which is wasteful and sad. Plus heated meals can boost mood, energy, and focus during that mid-day slump.
How Insulation Works
Insulation layers reduce heat transfer in three ways:
- Conduction, when heat travels through solid materials
- Convection, when warm air moves away inside the pack
- Radiation, when heat radiates outward
By stacking materials with different properties—reflective wraps, foam sheets, and snug containers—you tackle all three heat-loss methods.
Thermal Performance Factors
- Material thickness, thicker layers slow conduction better
- Air pockets, trapped air improves resistance to convection
- Reflective surfaces, foil wraps bounce back radiant heat
Choosing Insulation Materials
Picking the right supplies sets the foundation for effective in-pack thermal layering. Here are common options and how they compare.
Insulation Options at a Glance
| Material | Warmth Retention (hrs) | Flexibility | Pros | Cons |
|---|---|---|---|---|
| Reflective Foil Wrap | 2–3 | High | Thin, lightweight, cheap | Tearing risk, noisy |
| Closed-Cell Foam Sheet | 3–4 | Medium | Durable, moisture resistant | Bulky if thick |
| Insulated Lunch Bag | 4–6 | Low-Medium | Built-in pouch, easy setup | Takes backpack space |
| Gel Heat Pack | 2–3 | Low | Reusable, reheatable | Cold if not preheated |
| DIY Cloth Wrap (Fleece) | 1–2 | High | Soft, machine washable | Lower heat retention |
Reflective Foil Wrap
Wrap your container in pet-like mylar or aluminum foil wrap, they reflect radiant heat back into the meal.
Closed-Cell Foam Sheet
These thin sheets slip around containers to block conduction. You can cut them to fit snugly around jars or boxes.
Insulated Lunch Bag
Pre-built thermal pouches give you structure and space for multiple layers. Look for ones labeled “multi-layer insulation.”
Gel Heat Pack
Heat packs plug in or microwave before use. Tuck them alongside your food container to keep everything warm.
DIY Cloth Wrap
Use an old fleece scarf or towel to create a soft insulating blanket. This works best when layered over other materials.
Layering In-Pack Insulation
Now that you know the materials, here’s how to layer them inside your backpack. Think of this as building a mini thermos inside your bag.
Step 1: Create the Base Layer
Start at the bottom of the lunch compartment with a thin foam sheet or a folded fleece cloth. This blocks cold coming up from your bag.
- Spread a ¼-inch foam pad flat
- Place a reflective foil wrap on top of the foam
Step 2: Add the Container
Slide your preheated container into a snug insulated lunch bag or wrap it in foil. Preheating means running it under hot tap water for a minute then drying before filling.
Step 3: Insert Heat Pack (Optional)
If you’re using a gel pack:
- Heat it according to instructions
- Wrap it in a thin cloth to avoid direct contact
- Position it beside or beneath your container
Step 4: Top Layer Insulation
Cover everything with another foam sheet or folded fleece. This stops heat from escaping upward.
Step 5: Seal and Compress
Zip the insulated lunch bag closed or tie the cloth wrap. Compress the layers gently so they pack tightly together.
Layering Checklist
- Base foam or fleece layer
- Reflective wrap around container
- Gel heat pack for extra warmth
- Top foam or cloth barrier
- Snug closure without gaps
Packing Essentials
To get the most out of your insulation setup, organize and choose containers wisely.
Selecting the Right Containers
- Stainless steel thermos jars hold heat best
- Double-walled plastic containers offer balance between weight and retention
- Glass jars are heavy and risk breaking, so avoid them for school
Organizing Within the Backpack
Keep lunch away from cold textbooks or water bottles. Use a dedicated insulated compartment or a separate pouch. Here’s how to slot everything neatly:
- Lunch bag or wrapped container in center
- Heat pack or ice pack in a side pocket
- Snacks in adding easy-reach snack pockets inside backpacks for quick munching
Integrating With Your Daily Pack
If you’ve checked out back-to-school packs with internal insulation for lunch, you know some backpacks include built-in thermal liners. Even if yours doesn’t, you can retrofit one by sewing or Velcroing foam sheets inside an existing pocket.
Gear Maintenance
- Wipe down foam sheets and wraps after use
- Air out your lunch bag to prevent odors
- Wash cloth wraps weekly in cold water
Maintaining Heat
Even with perfect layering, a few extra tricks make a big difference.
Preheating Your Pack and Container
Why not get everything toasty before you pack?
- Run hot water through your thermos for 30 seconds
- Warm your foam or cloth layers near a radiator briefly
- Fill the empty lunch bag with hot water, then dump and dry before packing
Sealing Heat In
- Zip every pocket tight, avoid gap where warm air can escape
- Tuck fabric wraps under straps or buckles to hold them in place
- Use rubber bands or Velcro to compress the whole bundle
Weather Tips
On cold days, keep your backpack inside your coat during the walk to school. In rainy weather, add a waterproof layer by following advice in using weatherproof liners inside backpacks for rainy commutes
Adapting to Weather Conditions
Chilly mornings, windy afternoons, and indoor air conditioning all chip away at your meal’s warmth. Here’s how to adjust your layering plan:
- Near Freezing (32–40°F): Add an extra ⅛-inch foam sheet or two gel packs
- Cool (40–60°F): Standard 3-layer setup usually suffices
- Warm (Above 60°F): Skip gel packs to avoid overheating food before lunch
Windy or Sunny Walks
If you spend time outside, wrap your lunch bag in a wind-blocking scarf. That helps maintain interior temperature against gusts.
Indoor Cooling
Many schools blast AC, which can cool backpacks fast. Stash your lunch pack in a locker or classroom closet until it’s time to eat.
Cleaning and Care
Long-term performance depends on clean, dry insulation. Minimal upkeep goes a long way.
Daily Wipe Down
- Use a damp cloth and mild soap to clean foam and bag interiors
- Rinse reflective wraps gently, air dry completely
Weekly Deep Clean
- Wash cloth wraps in cold machine wash, air dry
- Disinfect thermos and containers per manufacturer’s instructions
Storage
Store foam sheets flat to avoid creasing. Keep all parts in a dry drawer or backpack organizer.
Avoiding Common Mistakes
Even the best layering plan can fail if you slip up. Watch out for these pitfalls.
Mistake 1: Skipping Preheat
Filling a cold container with hot food causes immediate heat loss. Always warm your gear first.
Mistake 2: Loose Layers
If wraps shift or pockets gape, heat escapes quickly. Check zippers and seals before heading out.
Mistake 3: Overstuffing
Too much bulk makes packing tight impossible. Follow the layering checklist and swap bulky items for thinner options.
Mistake 4: Mixing Hot and Cold
Storing a cold drink next to your lunch zaps thermal barriers. Keep hot items separate or use distinct pockets.
Frequently Asked Questions
1. How Long Will My Lunch Stay Warm?
With a 4-layer setup, most meals stay above 120°F for 3 to 5 hours. Thermal jars often extend that by an extra hour.
2. Can I Use a Regular Lunch Box?
Yes, but you’ll need multiple insulation layers inside. A designated insulated compartment works best.
3. Are Gel Heat Packs Safe for School?
Most reusable heat packs are non-toxic and school-safe. Just wrap them in cloth to avoid direct contact with food.
4. What’s the Best Container Material?
Stainless steel thermoses top the chart for heat retention. Double-walled plastic comes second for lighter weight.
5. How Do I Prevent Condensation?
Place a paper towel between foil wrap and container to absorb moisture. Air out layers daily.
6. Will Insulation Layers Add Too Much Bulk?
A well-planned 3 to 4-layer system stays surprisingly slim. Trade thick cloth wraps for thin foam if you need space.
7. Can I Use Ice Packs Instead?
Ice packs are for cold meals. Gel warmers exist but require microwaving before school.
Conclusion
Packing a hot, satisfying lunch doesn’t have to be a juggling act of awkward containers and cold bites. By layering in-pack insulation for hot lunch in school backpacks, you build an easy, reliable thermal system that keeps your food cozy until you’re ready to dig in. Give these tips a try on your next school day, and let us know if your chili still feels like it just came off the stove.
Next time you prep for school, remember simple layers, snug seals, and a little preheating go a long way toward a tasty warm meal. Enjoy lunch like a pro and stay toasty all day.


