How To Pack Light For A Photography Trip
Ever found yourself lugging half your house just to capture a sunrise shot? Learning how to pack light for a photography trip can save your back and keep you nimble on the move. In this guide, you’ll discover how to travel light with your camera gear, from choosing versatile lenses to organizing your bag for fast access.
You’ll walk away with practical tips to slim down your load without sacrificing the shots you crave. Ready to lighten your pack and sharpen your focus? Let’s dive in.
Select Multiuse Lenses
Carrying fewer lenses makes a huge difference in weight and decision fatigue; instead of packing every focal length, zero in on glass that covers the widest range of scenes.
Evaluate Focal Needs
- List the shots you expect: landscapes, portraits, street scenes
- Match your list to focal ranges—do you really need both 35mm and 50mm primes?
- Lean on zoom lenses when you want flexibility without swapping gear
Pick Versatile Zooms
Zooms like a 24–70mm f/2.8 or 24–105mm f/4 give you plenty of reach for travel shoots. Here’s why they’re crowd-pleasers:
- One-and-done solution for most scenarios
- Fast apertures for low light or subject separation
- Less swapping means fewer opportunities to drop dust on your sensor
If you’re shooting wildlife or sports, consider a lightweight 70–200mm f/4 instead of its f/2.8 sibling. You’ll save about 1.5 pounds and still get solid performance.
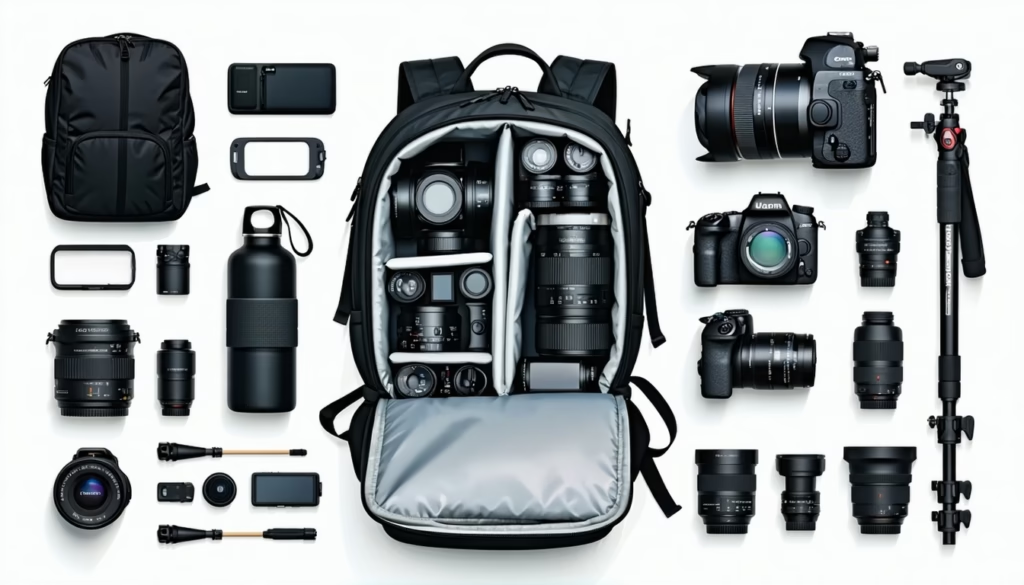
Pack Essential Camera Gear
Focusing on must-haves helps you avoid the “just in case” trap. Keep your core equipment streamlined.
Choose One Main Body
- Pick your favorite camera, leave backups at home
- Mirrorless bodies often weigh less than DSLRs, and pack one reliable shooter
- Insurance policies are nice, but carrying two bodies doubles the bulk
Manage Power Needs
- Bring only enough batteries to match your shooting days
- Charge on the go with a USB power bank and camera cable
- Label batteries so you know which ones are full
Protect Small Items
Storing memory cards, filters, and cables in a single pouch reduces rummaging. For the safest way to store memory cards in a backpack, tuck them into a padded case or use a card wallet that secures into a side pocket.
Choose Lightweight Accessories
Keeping accessories to a minimum is key. You can still shoot pro results without 10 pounds of gear.
Compare Tripod Options
| Tripod Type | Weight (Approx) | Pros | Cons |
|---|---|---|---|
| Ultralight Travel Tripod | 2–3 pounds | Compact, quick setup | Less stable in wind |
| Carbon Fiber Full Tripod | 3–4 pounds | Strong, durable | Bulkier folded size |
| Compact Monopod | 1–2 pounds | Quick repositioning | Limited stability |
Pack Filter Essentials
- One polarizer to tame glare and boost color
- ND filter for long exposures or bright scenes
- UV filter as lens protector so you skip a heavy lens cap
Choose Simple Straps And Grips
A sling strap or small hand strap tucks away more easily than a padded harness. You rock steady shots and still keep your shoulders happy. If you need more rain protection, check what to look for in a waterproof camera backpack before you head into mist or drizzle.
Organize Your Backpack
A chaotic bag adds seconds to every shot. Organizing by priority helps you grab what you need quickly.
Use Modular Inserts
- Swap foam dividers for padded cubes so you fit only what’s necessary
- Customize compartments to lens diameter and body size
- For more ideas, see how to customize a camera backpack with inserts
Pack By Frequency
- Stash your primary camera and lens in the top compartment
- Store backup gear and accessories in lower pockets
- Keep cleaning supplies and snacks in side pouches
Leverage Fast-Access Layouts
Side-zip panels and quick-access doors let you pull out your rig without taking the pack off. Explore the best camera backpack layouts for fast access to see different designs in action. You’ll shave critical seconds when a fleeting moment appears.
Balance Weight Distribution
Even a light pack feels heavy if it’s unbalanced. Properly loaded gear sits comfortably against your back.
Pack Smartly By Position
- Heaviest items near your spine, at mid-back height
- Lighter accessories toward the top and outer pockets
- Adjust side compression straps to pull the load inward
Secure With Straps
- Use internal tie-downs or Velcro straps to stop gear from shifting
- Tighten shoulder and hip belts so the pack rides close
- Prevent back pain by keeping the load centered—learn more about how to prevent back pain when carrying camera gear
Monitor Load Regularly
Every few hours, swing off your pack to check straps and re-center shifting gear. A quick adjustment can save soreness by day’s end.
Plan Clothing And Extras
Your wardrobe can double as padding and save precious ounces when chosen thoughtfully.
- Pick quick-dry, wrinkle-resistant pieces you can wash in a sink
- Roll clothes into cubes to compress volume and cushion fragile kit
- Layer outfits so you wear bulkier jackets during transit
- Limit shoes to one versatile pair you can walk miles in
Need to avoid overpacking a camera backpack? Pack outfits around your shooting schedule rather than “just in case” extras.
Check Airline Regulations
Flying with camera gear means juggling carry-on rules and checked baggage fees.
Know Size Limits
- Measure your packed bag—most airlines allow a 45–55 linear inch carry-on
- Confirm weight restrictions to avoid gate-check surprises
Prepare Documents
- Have receipts and gear values handy for customs
- Consider a padded hard case if you must check in—compare camera backpack vs hard case: which is better
Security Screening Tips
- Keep memory cards and batteries in an easy-to-reach pouch
- Inform TSA agents you have electronics, avoid last-minute bag dumping
A bit of planning keeps you shooting from takeoff through touchdown.
FAQs
How Can I Prevent Lens Scratches When Packing?
Use padded dividers or individual lens pouches. Wrap each lens in a microfiber cloth before placing it in its compartment.
What’s The Best Way To Store Extra Batteries?
Label batteries by charge level, then keep them in a small, padded pouch in an easy-to-reach side pocket.
Can I Bring A Tripod Through Airport Security?
Most travel tripods fit in carry-on luggage. If it’s too long, gate-check it or pack a compact monopod instead.
How Much Clothing Should I Pack For A Photography Trip?
Aim for three days of outfits, mixing and matching layers. Quick-dry shirts and convertible pants reduce bulk.
Is It Better To Use A Hard Case Or A Backpack For Travel?
Hard cases offer top-notch protection for checked gear, while backpacks give carry-on flexibility. Choose based on your itinerary and gear value.
How Do I Keep My Gear Safe In Crowded Places?
Keep zippers on the back or under your arm, and consider anti-theft camera backpacks with lockable sliders.
What’s The Ideal Backpack Size For Mirrorless Cameras?
A 20–25 liter pack usually fits a mirrorless body, two lenses, and a few accessories snugly without excess space.
Conclusion
Traveling light doesn’t mean you’ll miss out on great shots. By choosing versatile lenses, paring down to essential gear, and organizing your bag thoughtfully, you’ll stay nimble and focused on the shot, not the shoulder strain.
Give these tips a try on your next trip. You’ll be amazed at how much easier it is to chase that perfect light when your pack is as light as your creative spirit.
How to Measure Fit: Choosing a Backpack That Doesn’t Slouch
How to Pack a Backpack for 3 Days