How To Customize A Camera Backpack With Inserts
Customize Your Camera Backpack
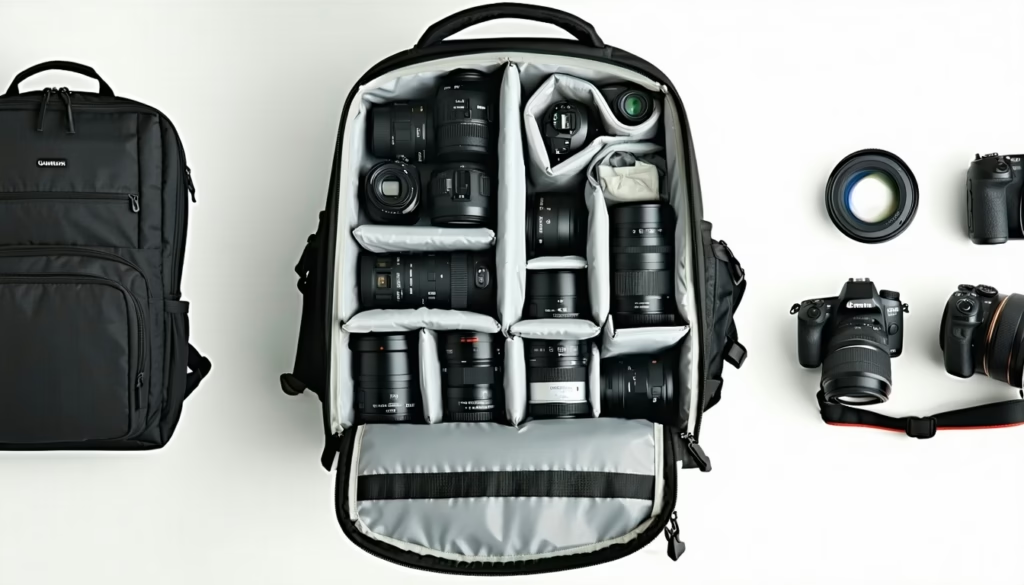
Why would you settle for a one-size-fits-all pack when you could build your own gear palace inside your bag? Customizing a camera backpack with inserts puts every lens, body, and accessory exactly where you need it. In this guide, you’ll learn step by step how to tailor your pack, so you spend less time digging and more time shooting.
Select The Right Inserts
Match Inserts To Your Gear
First, list all your camera bodies, lenses, flashes, and accessories. Then pick inserts made for those items. Foam cubes, padded dividers, and modular cubes each work differently. For lens pros, check out the best ways to organize lenses inside a camera backpack to refine your setup.
Measure Internal Dimensions
Grab a tape measure and note your backpack’s height, width, and depth. Precision here prevents wasted space or overstuffing. Draw a quick sketch, so you know where each insert will sit before committing to cuts.
Plan The Layout
Group Items By Frequency
Put your most-used gear in easy-reach spots, like side pockets or top compartments. Less-critical items can live at the bottom. This system speeds up lens swaps on the fly.
Balance Weight Distribution
Nobody likes a wonky pack that pulls you backward. Distribute heavy camera bodies close to your spine and lighter items outward. You’ll thank yourself on long hikes—learn more about how to prevent back pain when carrying camera gear.
Allow Space For Extras
Don’t forget room for memory cards, batteries, and cables. A slim pouch or small insert keeps cards safe—see the safest way to store memory cards in a backpack for extra tips.
Common Insert Types
Here’s the low-down on popular options:
| Insert Type | Features | Pros | Cons |
|---|---|---|---|
| Foam Cubes | Customizable grid, cut to size | Perfect fit, high protection | Time-consuming to trim |
| Padded Dividers | Velcro panels, adjustable walls | Quick repositioning, no cutting needed | Slightly less snug fit |
| Modular Cubes | Individual padded blocks with straps | Ultra-flexible, organized compartments | Can shift if not secured well |
Install And Adjust Inserts
Trim Foam With Care
If you picked foam cubes, use a sharp blade and straightedge. Cut slowly along your measurement lines. Always test-fit before you finish trimming.
Secure Dividers With Velcro
Attach panels where you want walls to stand. Press firmly so they stick tight. Velcro dividers make future tweaks a cinch.
Test And Tweak Fit
Load your gear and zip up your pack. Can you close it without forcing? Do items stay put when you shake the bag? Adjust or swap inserts until everything sits snugly.
Optimize Gear Access
Leverage Quick-Access Layouts
Want to grab your camera in under three seconds? Place bodies and prime lenses near side or top entrances. For more layout inspiration, explore the best camera backpack layouts for fast access.
Use Accessory Pouches
Clip small pouches inside for filters, batteries, or a mini toolkit. Clear-front pouches let you spot items at a glance.
Maintain Your Setup
Clean And Inspect Inserts
Every few shoots, remove inserts and brush out dust or grit. Inspect foam for cracks and swap out any dividers that lose their stickiness. For deeper care guidance, see how to clean and maintain a camera backpack.
Rearrange For New Gear
Got a new lens or drone accessory? Simply shift or swap inserts. This custom system grows with your kit so you never need a whole new backpack.
Frequently Asked Questions:
How Do I Choose The Best Insert Type?
Start by listing your gear, then match it to foam, dividers, or cubes based on how often you swap pieces.
Can I Mix Foam And Padded Dividers?
Absolutely. A hybrid approach often gives you custom fit plus quick tweaks.
How Often Should I Reconfigure My Backpack?
Revisit your layout whenever you add or replace gear, or at least once per season.
Are Modular Cubes Better Than Foam?
They’re easier to reposition but may not cushion as much as well-trimmed foam.
Will Inserts Add Lots Of Bulk?
When sized correctly, inserts fill empty space, not capacity. Your bag closes just as easily.
What Tools Do I Need For Foam Cuts?
A sharp utility knife, straightedge ruler, and measuring tape will cover most jobs.
Can Inserts Protect Against Impact And Moisture?
They cushion shocks but won’t waterproof your gear. For weatherproof tips, check out weatherproofing tips for your camera backpack.
Conclusion:
Customizing your camera backpack with inserts takes a bit of planning, but the payoff is huge. You’ll move faster, protect expensive gear, and adapt your pack as your kit evolves. Give it a try on your next shoot—you’ll wonder how you ever managed without a personalized setup.

How To Keep Backpack Dry In Rain College

How To Wash Osprey Backpack in Washing Machine