Space-saving Hacks For Camping Backpacks and Gear
Packing for a camping adventure can feel like a puzzle. Every item counts when you carry it on your back.
You want to bring a cozy sleeping bag, a tent, cooking gear, and still have room for snacks. Too often, your pack feels overstuffed and heavy.
That is where space-saving hacks for camping backpacks and gear come in handy. With a few simple tricks, you can shrink bulk without losing comfort.
In this guide, you will learn how to organize and compress your items with practical steps and real-world tips. Whether you are heading out for a weekend trip or a weeklong trek, these methods work.
Think of your pack like a living space and treat each cubic inch with respect. Ready to see how to squeeze more into your bag?
Let us walk through seven proven strategies so you can hit the trail with confidence and less weight. Keep reading to transform your packing routine.
You do not need fancy gear to start. Many hacks use items you already own or cost under twenty dollars.
By the end you will save space, reduce strain, and keep your essentials organized on the trail. Let’s get started.
Use Compression Sacks
Compression sacks crush bulky items to a fraction of their original size. They are perfect for sleeping bags, jackets, and fleece layers.
Here is a quick comparison of common sacks:
| Type | Material | Compression Level | Best For |
|---|---|---|---|
| Nylon Compression Sack | Lightweight nylon | High | Sleeping bags, quilts |
| Dry Sack | Waterproof TPU | Medium | Clothing, electronics |
| Vacuum Bag | Plastic, zip-seal | Very High | Bulkier items, jackets |
Steps to use them:
- Stuff the item loosely into the sack so there are no air pockets.
- Tighten the drawcord or zip the seal.
- Roll from the bottom up to force out air.
- Clip or buckle the top to lock in compression.
Tip: Vacuum bags offer the highest space savings but add weight and require pump or rolling effort. For a deep dive, check our guide on how to use vacuum bags for efficient space-saving packing.
Pack Clothes Strategically
How you pack clothing makes a big difference in available space. Start by sorting items into categories like base layers, mid layers, and extras.
Use packing cubes or stuff sacks to group similar items. Packing cubes create uniform blocks that slide easily into your pack. Stuff sacks with compression straps help squeeze air out.
Rolling clothes can save up to 20 percent more space than folding. Lay a t-shirt flat, roll tightly from the bottom, and secure with its own elastic or a rubber band. You can also mix rolling and folding for odd shapes.
For advanced layering tips see our step-by-step guide to layering clothes efficiently when packing.
Quick clothing checklist:
- Lightweight base layer (merino wool or synthetic)
- Insulating mid layer (puffy jacket or fleece)
- Rain shell or poncho
- Extra socks and underwear
- Camp clothes (shorts, tee, hat)
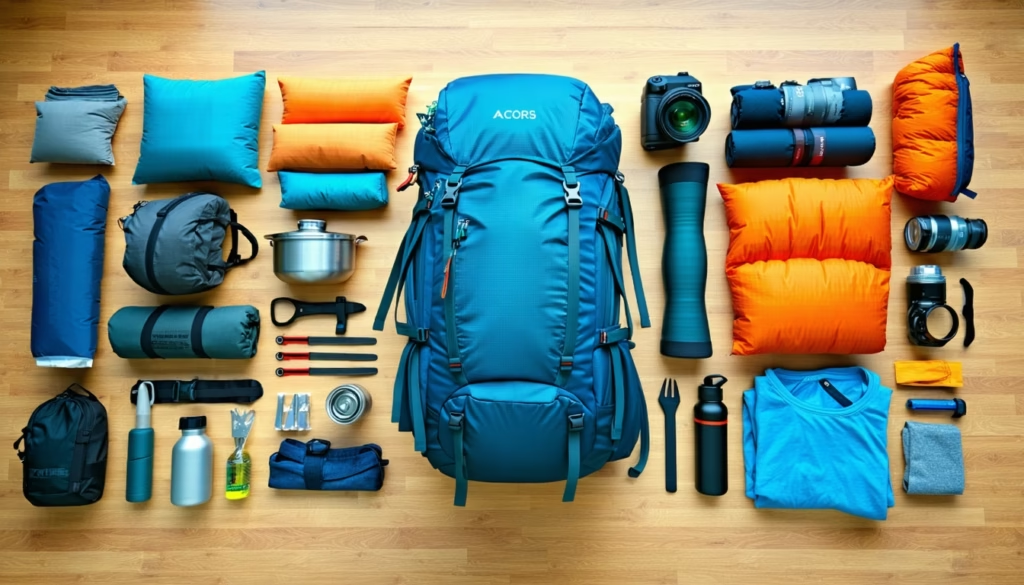
Layer Items Smartly
Packing isn’t just about stuffing everything in one big hole. It’s about building a stable core.
Start by placing heavy items like your stove, food bag, or fuel canister close to your spine and centered in the pack. This keeps weight off your shoulders and improves balance.
Next, fill gaps with medium-bulk items such as extra clothing or a compact tent. Then add lighter, bulkier gear like your sleeping pad or pillow toward the outer shell.
Use side pockets for water bottles, snacks, or items you’ll grab on the trail. Top off with rain gear or your rain cover so you can deploy it without unpacking.
If you want more layout hacks, explore our packing techniques for hiking backpacks with gear.
Organize Small Essentials
Small items can get lost at the bottom of your pack and drive you crazy. Keep them accessible with small pouches and external attachments.
- Zip-lock bags or dry sacks for toiletries and first aid
- Mesh pouches for electronics, cables, and chargers
- Carabiners to clip water bottles, keys, or a headlamp on the pack exterior
- Clear travel pouches for quick visibility
Consider a tiny hanging toiletry bag to stash toothbrush, sunscreen, and bug spray. For electronics, use a cable wallet or dedicated tech pouch. This prevents tangled cords and lost adapters.
If you struggle with toiletries, read our guide on how to pack toiletries to save space and avoid leaks.
Choose Multi-Use Gear
Every ounce counts, so opt for gear that pulls double duty. A few examples:
- Sleeping pad that converts to a seat cushion
- Bandana that serves as a towel, pot holder, or sling
- Multi-tool with knife, pliers, and screwdriver bits
- Down jacket that stuffs into its own pocket as a pillow
- Trekking poles that double as tent poles
Buying multi-use items reduces redundancy and keeps your pack light. It also speeds up setting up camp since you have fewer items to manage.
Make a list of your gear and mark each item’s functions. If it serves only one purpose, see if you can swap it for something more versatile.
Prioritize Lightweight Accessories
Swapping a heavy item for a lighter one can free up load and space instantly. Look for minimalist options without sacrificing durability.
- Ultralight titanium spork instead of full silverware set
- Ultralight stove and titanium pot
- Inflatable pillow instead of foam block
- Packable, wind-proof tent stakes (aluminum V-stakes)
- Compact water filter or purification tablets
Here’s a quick weight comparison:
| Accessory | Standard Weight | Lightweight Swap | Weight Saved |
|---|---|---|---|
| Spork Set | 80 g | Titanium Spork | 50 g |
| Camping Stove | 350 g | Ultralight Stove | 200 g |
| Pillow (foam) | 200 g | Inflatable | 150 g |
| Tent Stakes (8) | 160 g | V-stakes (8) | 80 g |
Even small savings add up over a multi-day trek. Always check gear specs before you buy.
Adjust Backpack Fit
A well-fitted pack compresses more easily and carries weight better. Take time to tweak every strap.
- Load the pack and tighten shoulder straps so the weight rests on your hips.
- Adjust the hip belt until it sits just above your iliac crest (hip bones).
- Use the load lifter straps near the top of the shoulder straps to pull weight forward.
- Tighten the sternum strap to prevent shoulder straps from slipping.
- Use side compression straps to flatten the load and minimize shifting.
If you still have extra loops or daisy chains, lash items like a foam pad or trekking poles on the outside. This frees up internal volume for soft goods.
Proper adjustment reduces fatigue and keeps your pack balanced on rough terrain. A snug pack also squeezes in more gear with less bulge.
FAQs:
How Do Compression Sacks Work And Are They Worth It?
Compression sacks squeeze air out of bulky items so they take up less volume. They really help with sleeping bags and jackets. Yes, they are worth it if you want a lighter and more compact pack.
Can I Use Vacuum Bags For Backpacking Gear?
You can, but watch for added weight and potential damage to insulating loft. Vacuum bags offer very high compression, but they need extra effort and may add bulk when empty.
What’s The Best Way To Pack A Sleeping Bag In A Backpack?
Use a small compression sack or stuff sack, not its large storage bag. Place it at the bottom or just above heavy items near your back for stability.
How Can I Keep Small Items From Getting Lost Inside?
Use clear zip-lock bags, mesh pouches, or a hanging toiletry bag. Clip tiny essentials like a headlamp or multitool to external loops for easy reach.
Should I Pack Rain Gear Inside Or Outside The Bag?
Keep rain gear in an easily reachable spot like the top lid or outer pocket. You want to pull it out quickly without unpacking your whole pack.
How Often Should I Reorganize My Pack During A Trip?
Reorganize when you hit major trail milestones or every 2–3 days. This helps you adjust to changing gear needs and keeps frequently used items accessible.
Conclusion:
By applying these space-saving hacks you will carry less weight, shop smarter for gear, and stay organized on every trail. Give a few tricks a try on your next trip, and notice how much more room you’ll free up in your pack. Safe travels and happy camping!
Tips For Packing A Drone And Camera Together Safely

What Not to Pack in a Diaper Backpack: Mistakes Dads Make